


Description
Get a seamless floor-to-turf image while practicing golf at home!
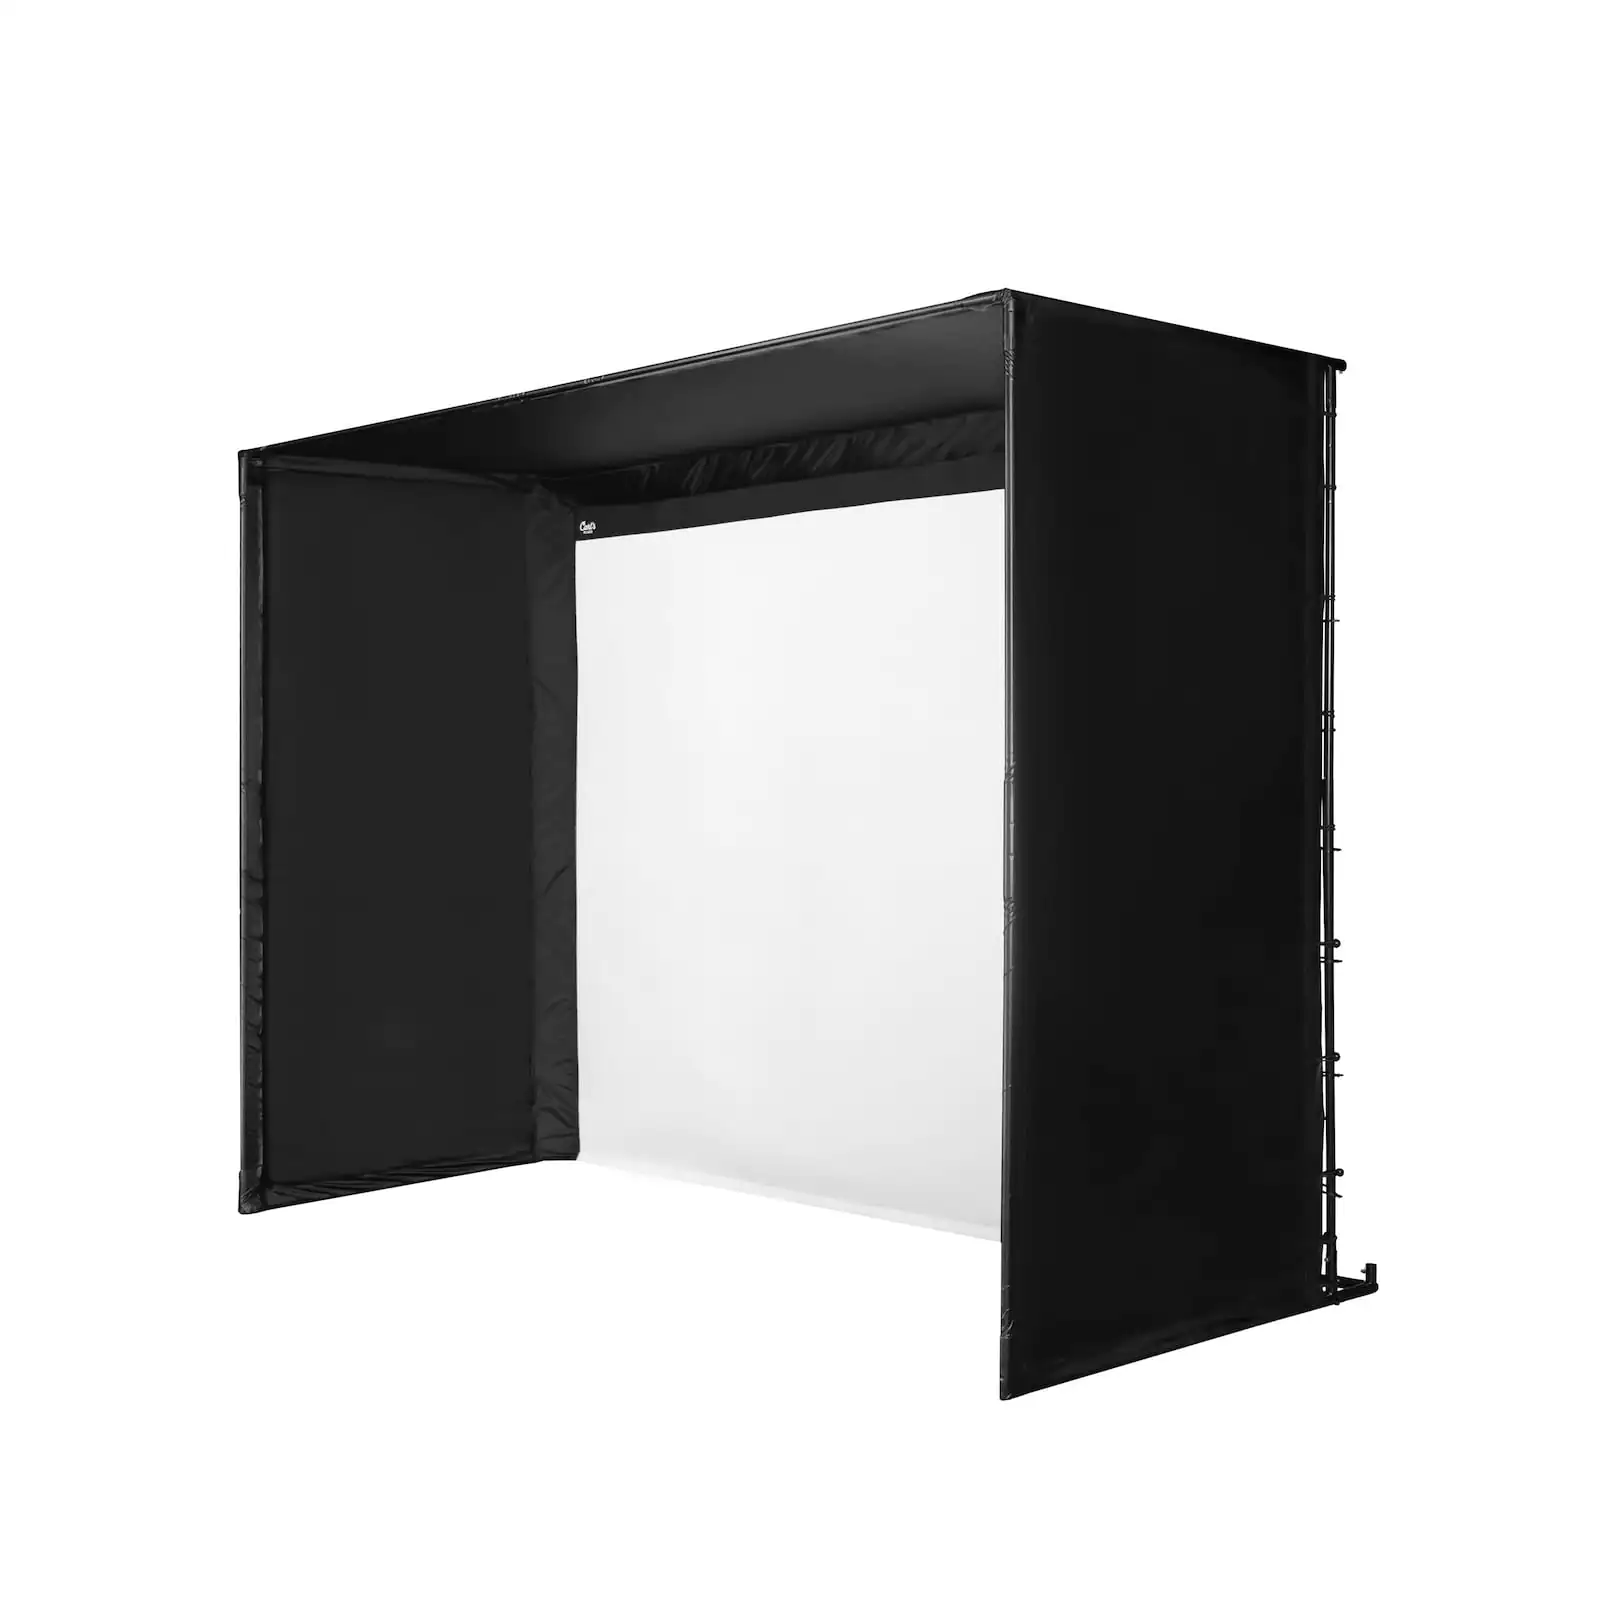
Carl’s Place DIY C-Series Golf Simulator Enclosure Kits are redesigned with an impact screen that perfectly brushes the floor. The high-quality nylon enclosure and connector fittings ensure a seamless setup. We’ll tell you what pipes you need, or just add our Pipe Framing Kit for a hassle-free, all-in-one home golf enclosure.
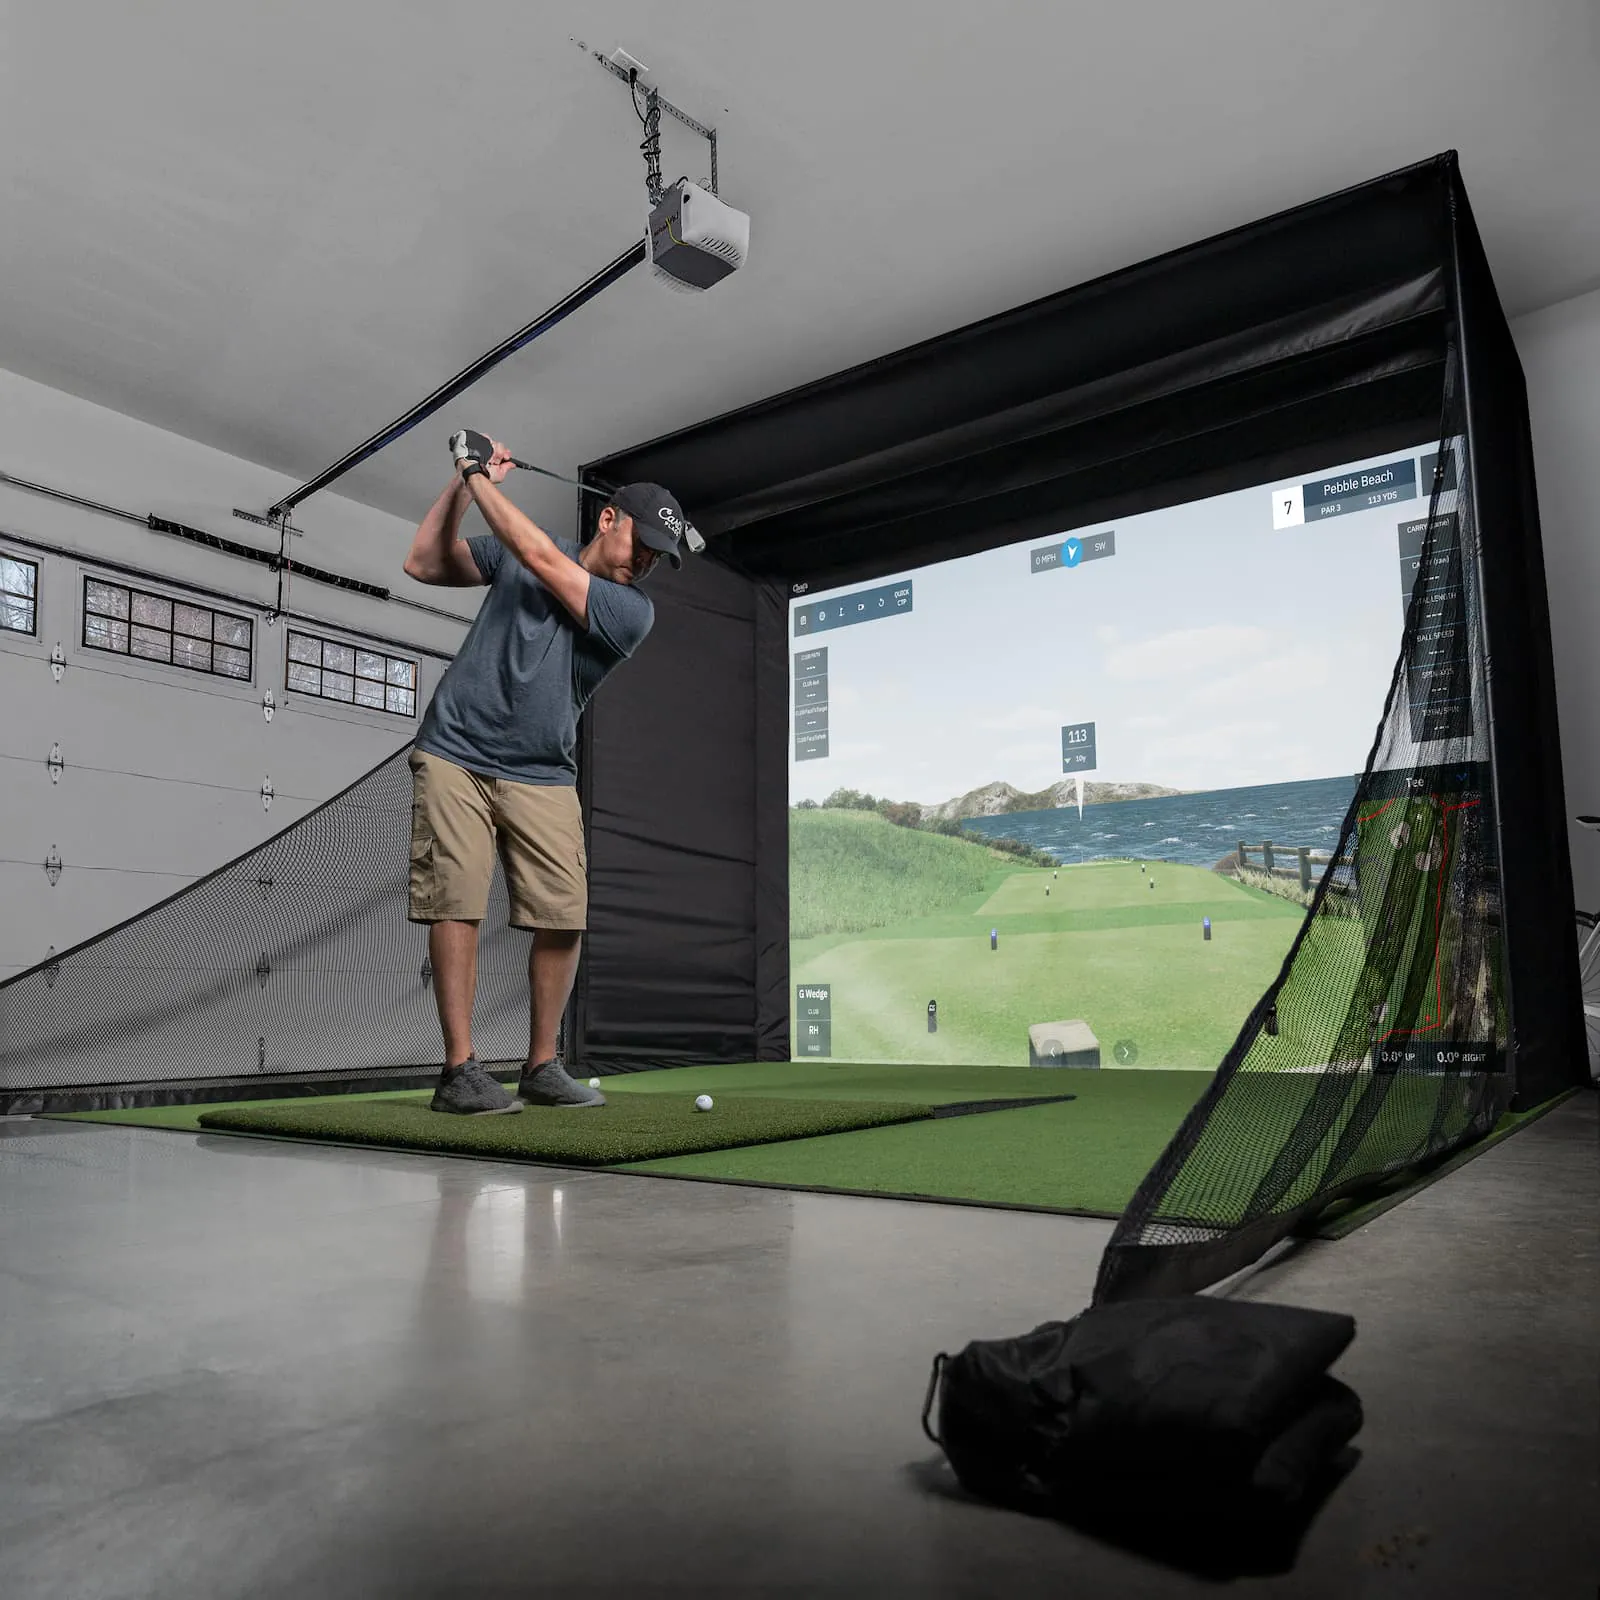
Play Golf in Floor-to-Ceiling Borderless Visuals
Immerse yourself in a seamless turf-to-screen experience with the cutting-edge design of our ingeniously crafted cabled screen, featuring a sleek borderless bottom.
Feel at ease practicing golf at home thanks to our innovative golf impact screen system. It incorporates releasable zip ties and a bottom cable, effectively preventing any golf ball bounceback.
Building a Home Golf Simulator? You got this!
With our easy, do-it-yourself design, you can save thousands by building your own fully-loaded golf simulators! Created to help users with one of the trickiest parts of building a home golf simulator: building the enclosure itself.
Our DIY Enclosure is designed to be flexible and customizable, to perfectly fit your space. You can choose your golf simulator size down to the inch with our online customizing tool.
Customize My Golf Simulator
Details
Picture yourself stepping into that spare room in your house, ready to perfect your golf swing at any time of the year. With Carl’s Place DIY Golf Simulator Kit, indoor golfing has never been easier.
Make the most of Carl’s DIY Golf Enclosure by pairing it with a top-notch launch monitor. Integrating a launch monitor tracking system within the enclosure opens up a world of knowledge about your golf performance. Gain insights into your swing like ball flight, spin, ball speed, and more. These insights are instrumental in elevating the quality of your golf practice sessions.
DIY Golf Simulator Enclosure Includes:
Your Choice of Impact Screen
Black Nylon Enclosure
Steel Fittings
Ball Bungees and Zip Ties
Optional Accessories
Pipe Framing Kit
Our Pipe Framing Kit is optional, but the pipes to build your frame are not. 1-inch EMT, which can be found at any local hardware store, is required to complete the assembly of your DIY enclosure (we’ll tell you exactly what you need).
If you’d rather have us include the pipe for you, this add-on kit includes black, powder-coated EMT pipes pre-cut to the exact lengths required – no pipe cutting or hauling required!
Foam Insert Kit
Get an extra measure of safety and the peace of mind that errant shots will not contact the frame with memory foam cushions in the perfect profile and lengths to insert behind the screen flaps of the DIY Golf Simulator Enclosure.
Back Cover Kit and Back Cover Pipe Kit
Baffles
Net Wall Extensions
Net wall extensions protect the walls of your enclosure without closing in your space. If errant balls are a concern, a set of golf hitting net extensions provides an additional barrier to keep your golf balls in the hitting area, not bouncing around your home. Simply attach onto the frame enclosure with hook and loop strips. A sandbag, at the bottom, holds it in place (fill not included).
Carl’s Golf Simulator Turf by Big Moss
Gorgeous turf that doubles as a putting green, cut and hemmed to seamlessly fit within your DIY Golf Enclosure Kit and extend 12′ from the screen. Looking for more of a challenge? We’ve got you covered there, too. Use the included undulation pads to simulate any terrain variation your heart desires. You’ll be putting like Steve Stricker in no time. Shop turf.
User Stories
The Unused Sunroom – Cody
The Budget DIYer – Guy

Ordering Information
Made to Order
Custom Golf Enclosures
Need a custom golf simulator enclosure? We can customize golf screens and enclosures down to the inch. Get the size that fits your space perfectly with this build your own golf simulator customizer.


Reign –
A Game-Changer for Golf Enthusiasts!
This DIY Golf Simulator Enclosure Kit with Impact Screen from Carl’s Place is a game-changer for golf enthusiasts who want to practice at home. The impact screen perfectly brushes the floor, providing a seamless image that truly immerses you in the game. The high-quality nylon enclosure and connector fittings ensure durability and stability. With this kit, you can take your golf practice to the next level!
Emersyn –
Improve Your Golf Skills Anytime, Anywhere!
With the DIY Golf Simulator Enclosure Kit with Impact Screen, you can improve your golf skills anytime, anywhere. The high-quality impact screen creates a realistic golfing experience, allowing you to practice your swings and shots with precision. The seamless floor-to-turf image adds to the authenticity, making you feel like you’re on a real golf course. This kit is a must-have for golfers who want to enhance their game from the comfort of their own home.
Raelynn –
Easy to Set Up, Easy to Use!
Setting up the DIY Golf Simulator Enclosure Kit with Impact Screen is a breeze. The kit comes with clear instructions and all the necessary connector fittings, making the installation process quick and hassle-free. Once set up, using the simulator is equally easy. The impact screen is durable and can withstand powerful shots, ensuring a long-lasting product that will provide hours of golfing fun.
Nevaeh –
Durable and Stable for Intense Golfing Sessions!
The high-quality nylon enclosure and connector fittings of the DIY Golf Simulator Enclosure Kit with Impact Screen ensure durability and stability during intense golfing sessions. You can swing with confidence, knowing that the enclosure will remain sturdy and the impact screen will hold up to your most powerful shots. This kit is designed to withstand the rigors of regular use, making it a reliable investment for any serious golfer.
Maverick –
Bring the Golf Course to Your Living Room!
With the DIY Golf Simulator Enclosure Kit with Impact Screen, you can bring the golf course to your living room. The seamless floor-to-turf image creates a realistic and immersive experience, allowing you to practice your golf skills without leaving the comfort of your home. Whether it’s raining outside or you simply want to avoid the hassle of going to a golf course, this kit provides the perfect solution. Get ready to improve your game and have fun with this innovative golf simulator enclosure kit.
Cartier –
I recently purchased the DIY Golf Simulator Enclosure Kit with Impact Screen from Carl’s Place, and I am extremely impressed with its quality and performance. This kit has completely transformed my spare room into a top-notch indoor golfing experience.
Osiris –
What sets this kit apart is the option to add the Pipe Framing Kit, which provides all the necessary pipes for a hassle-free setup. This all-in-one home golf enclosure makes it incredibly convenient for those who want a complete package without the need to source additional materials.
Vance –
I highly recommend pairing this enclosure with a launch monitor tracking system. By integrating a launch monitor, you gain valuable insights into your golf performance, such as ball flight, spin, and ball speed. This knowledge is essential for improving your swing and taking your practice sessions to the next level.
Demetrius –
The DIY Golf Simulator Enclosure Kit includes everything you need to get started, including your choice of impact screen, a black nylon enclosure, steel fittings, ball bungees, and zip ties. Additionally, Carl’s Place offers optional accessories such as the Pipe Framing Kit, Foam Insert Kit, Back Cover Kit and Back Cover Pipe Kit, Baffles, Net Wall Extensions, and Carl’s Golf Simulator Turf by Big Moss.
Kamryn –
Overall, the DIY Golf Simulator Enclosure Kit with Impact Screen from Carl’s Place is a fantastic investment for any golfer looking to practice at home. The quality and attention to detail are evident in every aspect of this kit, and the seamless floor-to-turf image adds a professional touch to your indoor golfing experience. I couldn’t be happier with my purchase and would highly recommend it to anyone in search of a high-quality golf simulator enclosure.
Rajeswari –
I recently purchased the DIY Golf Simulator Enclosure Kit with Impact Screen from Carl’s Place and I couldn’t be happier with my purchase. The redesigned C-Series enclosure kit features an impact screen that perfectly brushes the floor, providing a realistic and immersive golfing experience.
Rajeswari –
The high-quality nylon enclosure and connector fittings make for a seamless setup, ensuring that everything fits together perfectly. The kit also includes clear instructions on what pipes are needed for installation, or you can opt for the Pipe Framing Kit for a hassle-free, all-in-one solution.