


Description
The Simulator Series Projector Mount Kit is a device used to mount a projector onto a ceiling or wall for use in simulations, training, or gaming. It typically includes a mount bracket that attaches to the projector and a ceiling or wall mount that attaches to the building structure.
The mount bracket is designed to fit the specific model of projector and may include adjustable arms or brackets to allow for precise alignment of the projected image. The ceiling or wall mount is typically adjustable to accommodate different ceiling heights or wall angles.
The Simulator Series Projector Mount Kit may also include cables or wire management accessories to help conceal and organize the cables used to connect the projector to a computer or other source of video content.
These kits are often used in flight simulation, racing simulation, and other types of immersive training or gaming environments where a large, high-quality projected image is required.
The Projector Mount Kit is designed for use with The Net Return Simulator Series net. The Projector Mount Kit connects into the rear of the Simulator Series frame and is completely self contained.
The The Net Return Simulator Series ensures that you no longer have to attempt to connect your projector and mount to any ceilings, walls, etc. inside your home or facility. The Projector Mount Kit assembles in less than 15 Min. using our Quick Color Connect System and is designed to work with an Ultra Short Throw Projector and comes with a Premier Universal Projector Mount.
Extra Items Needed
A Projector, Simulator Software or Computer. You will need to obtain these items on your own.
Please Note – The Projector Mount Kit is designed only for our Simulator Series. It will not work with our Net Return Home Series Golf Pro net. If you are thinking about using a Projector with our Pro Series net, the mounting of the projector will need to occur off of a ceiling or wall.
| Projector Mount Kit |
| 1. Bay to simulation in seconds |
| 2. Out-of-sight design |
| 3. Seamless Clear|HD image |
| 4. Quiet impact / extremely durable |
| 5. Space saving |
| 6. Screen protecting |
| 7. Push-button action |
| 8. Easy to install (or we can do it for you) |
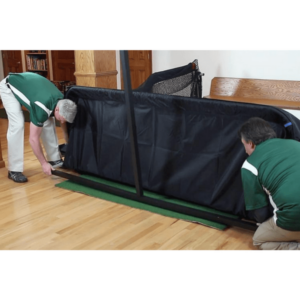
The Projector Mount Kit is designed for use with our Simulator Series net. The Projector Mount Kit connects into the rear of the Simulator Series frame and is completely self contained. This means that you no longer have to attempt to connect your projector and mount to any ceilings, walls, etc. inside your home or facility.
The Projector Mount Kit assembles in less than 15 minutes using our Quick Color Connect System. It is designed to work with an Ultra Short Throw Projector and comes with a Premier Universal Projector Mount. It is made of powder coated steel and weighs approximately 16 lbs.
What is not included: A Projector, Simulator Software or Computer- you will need to obtain these items on your own. What Projector do we recommend? Our two favorites are the Viewsonic – pjd6683ws (Ultra Short Throw Projector) or the Net Return Pro Series Golf Model # in118hd. The cost for these projectors on Amazon is approx. $750.00 – $900.00 USD. Please note the Projector Mount Kit is designed only for our Simulator Series and will not work with our Pro Series net. If you are thinking about using a Projector with our Pro Series net, the mounting of the projector will need to occur off of a ceiling or off the ground via a side throw projector.
Simulator Series Specifications
| Frame Height: 8’10” (Rear Display Bar) * With Projector Mount Kit Installed Height Increases to 9 feet. |
| Frame Height 8’2″ (Front Horizontal Tubing) |
| Frame Width: 8′ |
| Frame Depth: 3′ 6″ |
| Unit Weight: 58 lbs. (With Projector Mount Kit 64 lbs.) With The Projector Mount Kit Accessory Added – Max. Extension of arm 5’9″ from screen / with arm compressed 4’2″ from screen |
| Max Projector Weight on Projector Mount Kit 12 lbs. |
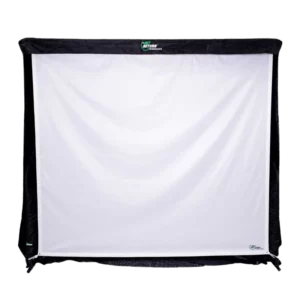
| The actual Simulator Series Screen is 100″ Tall x 87″ Wide (8’3″ x 7’2″). Bottom Left Corner to Upper Right Corner is – 131.5″ (10′ 9″) |
This allows you to plug in the projector model you are using, distance from screen, aspect ratio, etc. and provides you with an exact picture size ahead of time. Below is a link to a generic projector distance calculator, from Projector Central for you to use as an example www.projectorcentral.com/projection-calculator.cfmIn our Simulator Series video we used a ViewSonic Ultra Short Throw Projector. ViewSonic Model #pjd6683ws at a 4:3 Aspect Ratio. You will want to use a 4:3 Aspect Ration rather than a 16:9 Aspect Ratio due to the squareness of our screen. To test the exact size of the picture that will show up on the Simulator Series screen with your projector model, consult the manufacturer projector distance calculator.
How to Play Video -Simulator Series Projector Mount Kit
Olivia –
Great mount
It’s a great mount, I had to return because my projector was a little too heavy, as I would tighten the bolts they would start to strip/loosin up, totally bummed But would buy again for next “lighter” projector?!?
Oliver –
great product
I really like it. great quality. It was so easy to install. Also it has 3 differents ways to mount your projector. I would recommend it.
Noah –
Works great
Works well for where I needed it. The bolts strip out super easy tho while installing it.
Liam –
Good
Works on both of the projectors I have and was easy to install
Emma –
Works great for indoor projector
We use this for using with our projector inside for full wall TV viewing.
Alexander –
Great ceiling mount!
This is a really well-made ceiling mount. Nothing too difficult and it definitely holds my projector well. One thing I think that is missing is that it needs more of the black spacers of different lengths. Fortunately I had some of those so I was able to make it work. Another thing that would be nice is if I could tilt my projector up out of the way, but due to the way it’s made that’s not possible. The arm will tilt side to side but not front to back, so it’s impossible to tuck the projector up against the ceiling. Instructions left a bit to be desired but I was able to get it installed. Overall I think it’s OK and not a deal breaker so I would still recommend this product.
Evelyn –
Perfect mount and easy to install for my vaulted ceiling
Works great. Sturdy. Accidentally hit the proctor as I stood and mount kept it in place so very sturdy
Henry –
Nice
Husband liked it , he had bought one and he didn’t like it
Isabella –
Just what we needed for a ceiling mount projector
Our church had purchased another ceiling mount projector but did not have a height adjustment so we found this mount –solved all of the problems that we had.
Benjamin –
Very happy with the projector mount
I have a light weight projector that I use in garage to project computer screen on the wall. Decided to mount the projector permanently using this projector mount. I got help from handy person who installed it on the ceiling and connected the projector. No need to have shelf and clutter that comes with shelf. Now it all looks great and simple. Could adjust angle the way I had it on the shelf. As of today it is holding just fine.